Happy Friday

I found these flowers on a recent evening walk with the family.  I do not know what kind of flower they are, but they remind me of snapdragons. I loved the delicate flower up against the rough and textured bark of the trees.  It seems even mother nature isn’t ready for fall…

I hope everyone has a fantastic weekend!

Sarah

DIY {Spring to Fall Artwork}

Have you ever had a spur of the moment project idea and when you acted on it, it turned out EXACTLY how you had hoped? AND, it took less than 10min?  That’s how I felt the other day.   With all the fall decorating that has been going on over here, here, and here the living room was looking a little less than fall-ish.

I love the oversized painting above our sectional but it really is more for spring and summer. I like to decorate with the seasons and this painting was driving me crazy.  Last year, I tried a little collage wall

But didn’t really want to go that route again. Then it just hit me like THAT! I had a table cloth that was bold, graphic, and the perfect colors. After a quick trial run, I knew it would work, so I ironed that bad boy and whipped out the masking tape!

I laid the tablecloth on the floor with the painting on top and pretty much wrapped it like a present being sure to wrap tightly so I wouldn’t have any wrinkles.

It was a snug fit, I wasn’t sure if it was even going to cover the corners but luckily it did which means it was meant to be!

Viola!!!

Easy. Peasy.

I just don’t think it gets any easier than this. Best part is, when I’m tired of it all I have to do is just pull the tape up.  I won’t damage the canvas or the fabric.

Here’s a quick before & after shot

You also may have noticed my favorite blue chair is no longer with us. I picked this gal up last year for $5 at a yard sale and I’ve loved her ever sense. I’ve gotten my money’s worth.

RIP

This means I’ll have to learn upholstery 101 stat. I’ve already got the chair, if you can remember from earlier in the summer, and I already have an idea of what I want, I just need to find the right fabric and the time…

I hope everyone has a great day!

Sarah

The DIY Show Off

Fall Mantel

I thought I’d share the rest of my fall decorations for inside the house. I’m still working on the front entrance; just gotta pick up a few more things to complete it.

Remember when I shared a few in-store tablescapes from my trip out of town?  I got inspired and decided to get a jump on fall even though we were still in 80 degree weather at the time!

I used to go all out for holidays. I used to do big displays for every holiday. I don’t have the time anymore, and I prefer to do simple vignettes using more natural materials now. They are simple but can make a big impact.  In fact, I think I only used less than 1/2 of all the decorations I had in the rubbermaid bin. I pretty much looked to nature to decorate for this fall season.

For the fireplace mantel I decided to use a few of my white pumpkins nestled inside random glass vases at different heights. I filled the vases with lentils and then tucked the pumpkins inside. I also used a few random textured balls, a few old books, and a found deer antler to bring it all together. It’s simple but lovely.  The best part, is that it will last until it’s time to bring the Christmas decorations out (Christmas~What?! eek!!)

Never mind the hideous gold frame around my Grandmother’s painting. One of these days I’ll tackle it.  I think if I just toned down the in-your-face gold gaudiness it might not be so bad:)

I painted the mantel in April when we were doing our mini renovation.  When we first moved into our house it looked like this

I painted it in faux burl wood and I liked the way it turned out until our custom made gun cabinet and bookcase were installed (thanks Dad!).  The colors just weren’t jive’n for me so I painted it like everything else I don’t like!

We also said ba-bye to the sponge painted accent wall.

This room still isn’t ready for a full room tour; one day~soon!

I also did a little something to the fireplace in our living room that also acts as our tv stand. This was even simpler. 2 tall vases full of more white pumpkins and I added some twine to add a little interesting texture.

I also added a shallow wooden platter full of fall potpouri.

And a LARGE grapevine cornucopia on the dining table with a fix of real and faux pumpkins, dried gourds, a deer antler, pheasant  feathers, and a leave garland.

Here are a few other shots of some of the simple displays I have around the house.

So, has anyone else gotten into the fall season? Have you done any decorating?  Do share!!

Sarah

27 Pumpkins

That’s how many pumpkins I got from one misplaced seed that sprouted this spring.  In getting into the spirit of the season, I filled an old muffin tin with a mix of pumpkins and fall potpourri

That same day, I cut a ton of the limelight hydrangea blooms off the bush and put them around the house to dry

In other news, I FINALLY finished the succulent garden.  It only took all summer to collect the tin cans!  All I did was buy a few different types of succulents and then divided them into the number of slots of my Pepsi crate and planted them in tin cans.

The DIY Show Off

DIY {Simmer Pot Mix}

As much as I’d hate to admit it, fall is just around the corner.  I’ve been working on a few things to get me in the spirit of the changing seasons and one way is this simmer pot mix.  This mix, when heated on the stove or a simmer pot, will smell your entire home with it’s delicious scent.  You can use whatever herbs or spices you have on hand.

Simmer mixture in a pot of water; just be sure to keep an eye on the water level and add more as needed.  The mixture should last over several sessions.

Enjoy!

Sarah

Retail Therapy

I was out of town for work earlier this week which meant I got to go shopping! I don’t have great home decor stores close by home so I took the opportunity to get inspired for fall. I love this time of year, I really do, but I also have a hard time of letting go of the summer. As much as I love this time of year, it is only a reminder that winter is also coming and that’s the part of fall I do. not. like. But there isn’t anything I can do about that so I might as well just embrace it and go with it!

I snapped a few display ideas I saw while I was out that gave me some inspiration and I wanted to share them with you. They would all be so easy to do and you might already have the supplies on hand.

20110915-061704.jpg

This was a tablescape at Pottery Barn. It could be so easy to recreate at home. You can find large hurricane globes at thrift stores for just a few dollars each. The leaf garland and even a large candle could be found at a Dollar store or Big Lots if you have them in your area. The ceramic pumpkins would also be easy to find on a tighter budget. Use your own dishes and add festive napkins in a complimentary color scheme. If you can’t find cloth napkins for a reasonable price, look into making your own. I’ve seen lots of tutorials for making your own floating around the Internet. One last thrift idea to recreate this look. Go to a fabric store and get a piece of fall fabric cut to your specific size rather than buying a table cloth. This will save $ especially if you bring a coupon with you. Jo Ann’s normally has their flyers by the front door and there is normally a 40% off coupon in it.

Here is a close up of the hurricane.

20110915-062830.jpg

I also wanted to show you all this display they had set up

20110915-063005.jpg

The bags of moss filler were selling for $10 a bag! I’ve gotten almost the exact same type of moss at Dollar Tree. Most craft stores will also sell different types of moss for less {don’t forget that coupon too}. They were also selling square glass vases. I didn’t look at the price but I bought square vases from Dollar Tree and I think the quality is better.

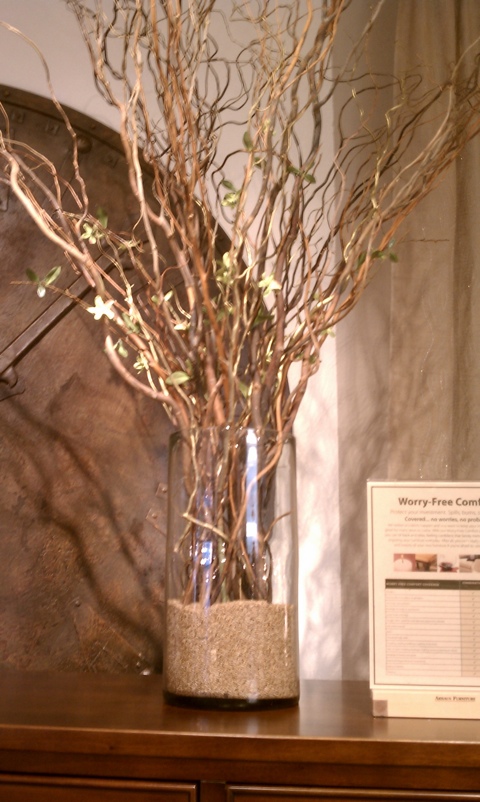
One other idea I snapped that night was from my favorite furniture store, Arhaus Furniture. They have amazing Visual people that style and decorate their stores. Most of the time, their ideas are simple but can be stunning. This particular store is using brown rice in all their vases throughout the space to help bring in fall. They used simple sticks, curly willow, moss, and other natural elements to help tie in the decorations to their natural, rustic style furniture,

20110915-063751.jpg

Rice would be a great filler, but don’t stop there! Why not cruise through the grocery store for inspiration? Try beans, they come in a variety of colors and textures, legumes, wild rice, and even coffee beans can be great fillers. And they are CHEAP!

I hope I’ve inspired you today! I know I was, I got busy last night starting my fall decorating. I’ll show you what I’ve done with my pumpkins and a few other things when it’s done.

Have a great day!

Sarah

Before and After {Coffee Table}

This was our hand-me-down Queen Ann coffee table.  You can see, I’d already re-worked it once, about 8 years go.  I striped the old finish off and did a tortoise shell faux finish on top and darkened the legs and base. The top was starting to show wear and I was really tired of the look so I gave it another makeover.

I gave it a coat of Butternut Squash paint, distressed the whole piece and finished it off with a coat of wax.  It’s now time to say good-bye to this piece as our new coffee table is ready! Email me if you are in the Northern VA area and are interested!

Before & After {Kid’s Artwork Frame}

Good morning!  I hope everyone had a great weekend! How about a little before and after to get things going this week?

I picked up this frame at a yard sale last month.

I used spray paint I already had on hand and attached some chicken wire I picked up on freecycle.  Are you a member of freecycle? If not, you NEED to join.  Seriously. No excuses.  Freecycle is a network of people who give stuff away in order to keep items out of the landfill.  Did i mention everything is FREE? Well it is.  Every morning I get an email of all the things people are offering for FREE.  If you find something you would like you simply email that person and you arrange for pickup. I can’t even begin to count the number of things I have given away on freecycle.  I normally put something on my curb, place my offer on freecycle and within minutes, have several offers to take it off my hands! It’s a great way to get rid of things quickly and easily and keep stuff from going to the landfill!

Anywho, back on target. I attached chicken wire to the backside of the frame and now I have a beautiful frame to display little man’s artwork he brings home from school!

Here’s the little corner where the artwork is displayed

I also thought I’d share another frame I’ve done in a similar way to display photographs but this one was even simpler to do.  I just attached a few rows of twine to the back and ta-da!

The DIY Show Off